
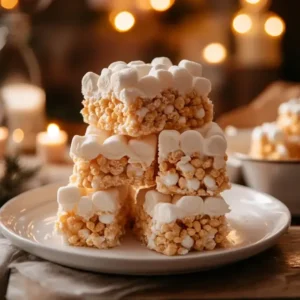
Nothing beats a gooey, chewy, and buttery Christ Crispy Treats recipe when you’re craving a fun and easy snack!
In this guide, we’ll dive into everything you need to know about making the most delicious, soft, and flavor-packed crispy treats you can imagine.
We’ll talk about the best ingredients, step-by-step instructions, flavor ideas, common mistakes to dodge, and even answer your biggest questions at the end!
Oh, and we’ve added nutrition facts, tips, and even decorating tricks to make your treats pop.
Alright, ready to get cooking? Let’s hop right into it!
Christ Crispy Treats
What Makes Christ Crispy Treats Special?
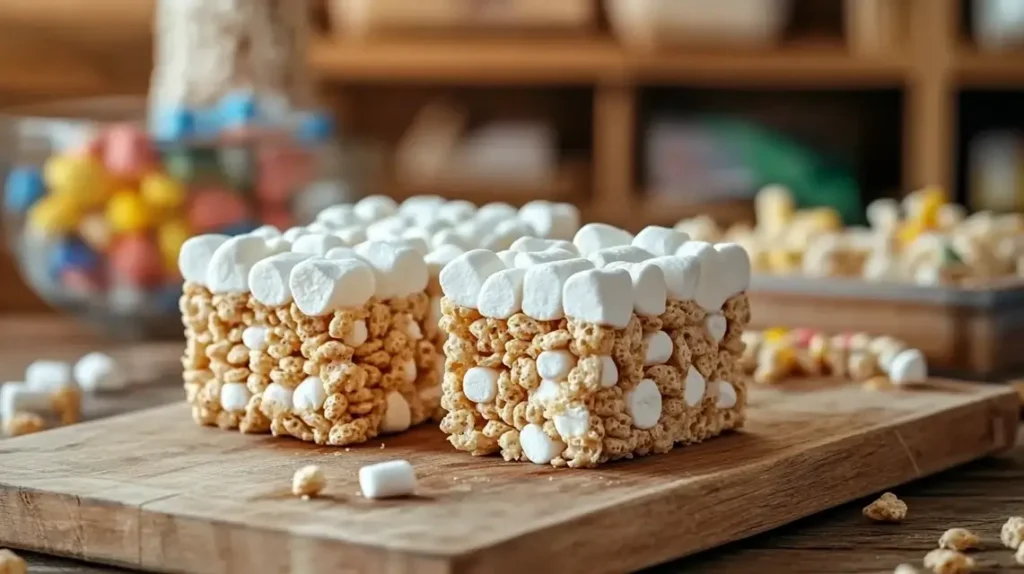
“An inviting shot of freshly prepared Christ Crispy Treats highlighting the simple, homemade vibe.”
Ever wonder why Christ Crispy Treats are just so irresistible? Well, it’s all about that perfect mix of buttery, marshmallowy goodness wrapped around crispy cereal. These treats aren’t just sweet they’re magically chewy, melty, and full of love.
“A good crispy treat should feel like a hug in your mouth soft, sweet, and just a little bit crunchy!”
Unlike regular Rice Krispie treats, the Christ Crispy Treats recipe often adds a little extra butter, vanilla, and even fun toppings to make every bite special. Plus, they’re super easy to personalize!
Why Everyone Loves These Treats
Honestly, there’s a million reasons people go wild for these snacks!
First, you only need a few simple ingredients nothing fancy or hard to find. Second, they’re no-bake, which means you don’t have to turn on the oven (especially nice during hot months!).
And best of all? You can whip them up in just 10 to 15 minutes. Talk about fast and fabulous!
Here’s a quick look at what you’ll usually need:
| Ingredient | Quantity |
|---|---|
| Butter | 6 tablespoons |
| Mini Marshmallows | 10 cups (divided) |
| Rice Krispie Cereal | 6 cups |
| Vanilla Extract | 1 teaspoon |
| Salt (optional) | A pinch |
And trust me once you learn how easy it is to make a Christ Crispy Treats recipe, you’ll want to make them for every party, picnic, or lazy Sunday afternoon.
Ingredients You Need for Perfect Christ Crispy Treats
Must-Have Ingredients for Christ Crispy Treats Recipe
Making a tasty Christ Crispy Treats recipe starts with having the right stuff on hand. Luckily, you don’t need much! Everything is simple, and you might already have these in your kitchen.
Here’s a quick table to keep things easy:
| Ingredient | Amount |
|---|---|
| Unsalted Butter | 6 tablespoons |
| Mini Marshmallows | 10 cups (divided) |
| Rice Krispie Cereal | 6 cups |
| Vanilla Extract | 1 teaspoon |
| Pinch of Salt (optional) | Just a little pinch |
“Using fresh, soft marshmallows is the biggest secret to creating that perfect gooey pull you crave!”
Using unsalted butter lets you control the saltiness, making your Christ Crispy Treats melt-in-your-mouth good.
Best Marshmallows to Use
Not all marshmallows are created equal!
When picking marshmallows for your Christ Crispy Treats recipe, always go for mini marshmallows. They melt faster, smoother, and make it easier to coat every piece of cereal.
Pro tip?
“Stay away from old, dry marshmallows they don’t melt well and can leave your treats hard and crumbly.”
Picking the Right Cereal
Of course, you want that perfect crisp bite!
Stick to the classic Rice Krispies cereal for the best texture. But hey, don’t be afraid to get a little creative other crisped rice cereals can work too.
If you’re curious about using fun ingredients, you might also enjoy looking at this guide to festive cookies for other cool snack ideas!
Secret Add-ins for Extra Flavor
Want your Christ Crispy Treats to be next-level yummy? Here are some tasty bonus ideas you can mix in:
- A swirl of peanut butter for a nutty flavor.
- A handful of mini chocolate chips.
- Some sprinkles for a pop of color.
- A light sprinkle of sea salt for that sweet-salty vibe.
Adding extras makes the treats even more fun and they’re perfect for parties or holidays!
How to Make Christ Crispy Treats Step-by-Step
Easy Christ Crispy Treats Recipe to Follow
Ready to dive into making your very own Christ Crispy Treats recipe? It’s super simple. Plus, it’s a lot of fun perfect for kids to help with too!
Here’s a block quote to kick it off:
“When it comes to making the perfect treat, slow and steady wins the race don’t rush the melting!”
Here’s your simple game plan:
- Grease a 9×13-inch pan with butter or cooking spray.
- Melt 6 tablespoons of butter in a big pot over low heat.
- Add 8 cups of mini marshmallows to the melted butter, stirring until they melt completely.
- Remove the pot from the heat.
- Stir in 1 teaspoon of vanilla and a pinch of salt.
- Pour in 6 cups of cereal and gently fold until coated.
- Quickly add the remaining 2 cups of marshmallows for extra gooeyness.
- Press the mixture lightly into the pan don’t smash it down too hard.
- Cool, cut, and devour!
Preparing Your Tools and Pan
Before you even melt the butter, you’ll want to have everything ready. Trust me, once the marshmallows are melted, things move fast!
You’ll need:
- A big heavy-bottomed pot
- A buttered spatula
- A 9×13-inch baking pan
- Some parchment paper (optional but helps a lot)
Greasing the tools and pan first keeps everything from becoming a sticky nightmare!
Melting the Butter and Marshmallows Just Right
When melting the butter, keep your heat low and slow. If you rush it, the butter can burn and burnt butter = bitter treats!
Once melted, toss in your marshmallows. Stir constantly and watch them transform into a smooth, creamy cloud.
“If you see brown bits, you’ve heated it too high keep it gentle for best results!”
Mixing and Pressing Without Overworking
After the cereal is added, work quickly but gently. You want every piece coated but still fluffy.
When pressing into the pan, don’t squish too hard. You’re aiming for light and airy, not dense and hard.
A buttered spatula or even wax paper can help you spread the mixture evenly without sticking.
Tips for the Gooey, Chewy Christ Crispy Treats
Expert Tips for the Best Christ Crispy Treats
Alright, let’s make sure your Christ Crispy Treats recipe turns out amazing every single time! A few smart moves can change everything no kidding.
Here’s a golden tip:
“Don’t overcook your marshmallows the gooey magic comes from gentle melting, not rushing!”
Another handy trick? Always use fresh marshmallows. Old ones just won’t give you that lovely soft stretch everyone loves.
Also, add a few extra mini marshmallows at the end before pressing the mix into the pan this sneaky trick gives your treats those ooey-gooey pockets of melty goodness.
The Perfect Butter-to-Marshmallow Ratio
You can’t just guess here!
The butter and marshmallow balance is everything in a Christ Crispy Treats recipe. Too much butter makes the treats greasy, while too few marshmallows can make them dry and stiff.
Stick to the magic formula:
- 6 tablespoons of butter
- 10 cups of marshmallows
- 6 cups of cereal
Following this keeps your bars chewy, sweet, and just sticky enough without feeling heavy.
How to Avoid Hard, Dry Treats
Nobody wants crispy treats that snap like a cracker.
The biggest mistake? Melting the marshmallows too fast over high heat. Always keep it low and slow, stirring often.
And when pressing the mix into the pan, be gentle. Don’t press like you’re flattening a pizza light hands make soft, fluffy treats!
Tricks for Cutting Clean, Even Squares
Ever ended up with messy, jagged squares?
Here’s how to slice neat ones:
- Let the treats cool for at least 1 hour.
- Butter or spray your knife lightly before cutting.
- Use a sharp, large knife not a little butter knife!
- Cut straight down, not back and forth like you’re sawing.
Flavor Variations to Try
Fun and Tasty Christ Crispy Treats Variations
One of the coolest things about a Christ Crispy Treats recipe is that you can tweak it a hundred ways! Adding a little twist makes them even more exciting, especially for birthdays, holidays, or just because.
Here are a few favorites:
- Chocolate-Dipped Treats:
Dip half of each square into melted chocolate, then add colorful sprinkles. Instant party vibes! - Peanut Butter Crunch:
Stir a half-cup of creamy peanut butter into the melted marshmallows before adding the cereal. - Holiday Flavors:
Add red and green sprinkles for Christmas, pastel ones for Easter, or spooky colors for Halloween.
“Treats that fit the season always taste a little sweeter!”
Chocolate Dipped Treats
Nothing says fancy like a simple dip in chocolate.
After cutting your treats into squares, melt about 1 cup of semi-sweet chocolate chips. Dip one side of each treat and lay them on wax paper until the chocolate hardens.
Trust me they look store-bought but taste homemade!
Peanut Butter Crunch Version
If you love peanut butter (who doesn’t?), this one’s for you.
Before mixing the cereal into your melted marshmallows, stir in half a cup of creamy peanut butter.
The flavor is rich and nutty, and it goes perfectly with the sweet marshmallow pull.
Festive Holiday Flavors
Want to get super festive?
All you need are some colorful extras like:
- Red and green candy melts
- Rainbow sprinkles
- Crushed peppermint candies (for Christmas treats!)
- Mini M&M’s
Press these on top before the treats cool completely so they stick nicely.
Decorating and Shaping Christ Crispy Treats
How to Decorate Christ Crispy Treats for Special Occasions
Decorating your Christ Crispy Treats recipe is one of the best parts it’s where you can really let your creativity shine!
Whether it’s for birthdays, holidays, or school parties, a few simple tricks can make your treats stand out.
Here’s a quick idea:
“Adding a little color or sparkle turns plain treats into party-ready bites!”
You can drizzle them with melted chocolate, sprinkle colored sugar on top, or even add candy eyes to make them look like little monsters for Halloween!
Sculpting Shapes for Parties
Why stick to boring squares when you can have fun shapes?
Using cookie cutters is an easy way to make Christ Crispy Treats extra special.
After you press the treats into a pan and they cool a little, grab your favorite cookie cutters and start cutting!
Fun shape ideas:
- Hearts for Valentine’s Day
- Christmas trees for December
- Stars for birthday parties
Pro tip: Butter the cookie cutters lightly so the treats pop out easily!
Using Colored Marshmallows and Sprinkles
Want your Christ Crispy Treats to scream “fun”?
Try using colored marshmallows! They melt just like regular ones but add a cool tint to your treats.
Or go wild with sprinkles toss them into the cereal mix or sprinkle them on top right after pressing.
It’s an easy way to match any party theme without spending extra money.
Making Treat Pops on Sticks
Here’s a trick kids (and adults!) love:
After cutting your treats into squares or shapes, stick a lollipop stick into each one. Then dip the tops in chocolate or frosting.
Not only are they super fun to eat, but they’re also way less messy win-win!
Storing and Freezing Your Treats
How to Keep Christ Crispy Treats Fresh
Let’s be real Christ Crispy Treats are so good they probably won’t last long!
But if you do want to save some for later, you’ve got to store them right.
After your treats are fully cooled, cut them into squares. Then:
- Wrap each one individually in plastic wrap
- Or place them in a large airtight container
- Keep them at room temperature, not in the fridge
“Cold air makes them hard and nobody likes rock-solid treats!”
Stored properly, your Christ Crispy Treats recipe will stay fresh and chewy for about 3-4 days.
Best Containers for Storage
Picking the right container makes a big difference.
Use a container that’s just the right size so your treats don’t get squished but also don’t have too much empty space (which dries them out).
Here’s a quick tip:
- Plastic containers with tight lids work best.
- Line the bottom with parchment paper if stacking multiple layers.
Can You Freeze Christ Crispy Treats?
You bet you can!
If you want to keep your Christ Crispy Treats even longer, freezing is a great option.
Here’s how to freeze them like a pro:
- Wrap each square tightly in plastic wrap.
- Place the wrapped treats in a freezer bag.
- Squeeze out as much air as possible before sealing.
When you’re ready to enjoy them, just leave the treats out at room temperature for about 30 minutes.
They’ll taste almost as good as the day you made them!
Common Mistakes to Avoid
What Can Go Wrong With Christ Crispy Treats Recipe
Even though making a Christ Crispy Treats recipe is super simple, a few little mistakes can mess things up big time!
But don’t worry if you know what to watch for, you’ll nail it every time.
Here’s something to remember:
“Small mistakes like rushing or using old marshmallows can turn soft, dreamy treats into hard, sad snacks.”
Sometimes the tiniest changes like heating too fast or pressing too hard can make a big difference in the final treat.
Overcooking the Marshmallows
This is the number one mistake!
Melting marshmallows over high heat makes them tough and rubbery. That’s why your Christ Crispy Treats recipe might turn out dry or crumbly.
Always, always melt on low heat, and be patient. Stir often to keep things smooth and creamy.
Pressing Too Hard Into the Pan
When it’s time to press your cereal-marshmallow mix into the pan, be gentle.
If you press too hard, the treats will get really dense and lose that soft, chewy texture you want.
Instead, lightly pat the mix down with a buttered spatula. Just enough to flatten not smash!
Using the Wrong Cereal Type
It might sound silly, but using the wrong kind of cereal can change everything.
Stick with original Rice Krispies or a very similar crisp rice cereal.
Big, puffy cereals or flavored ones might not hold together well, and they can make your treats soggy.
Following the classic cereal choice helps your Christ Crispy Treats recipe stay light, crispy, and dreamy!
Christ Crispy Treats for Special Diets
Make Christ Crispy Treats for Everyone
Good news!
You can easily adjust your Christ Crispy Treats recipe so almost everyone can enjoy them, no matter their diet.
With just a few swaps, they can be gluten-free, dairy-free, or even vegan!
Gluten-Free Christ Crispy Treats
Guess what?
Rice itself is gluten-free, but some cereals have extra ingredients that aren’t.
Always check the label and look for brands that are certified gluten-free.
Also, double-check your marshmallows and other add-ins. Some flavored marshmallows can sneak in gluten.
If you stay smart with your ingredients, your Christ Crispy Treats can be 100% safe for gluten-free friends!
Vegan and Dairy-Free Alternatives
Want a dairy-free or vegan version of your favorite treat? Easy!
Here’s how to swap things out:
- Use vegan butter (like Earth Balance).
- Choose vegan marshmallows (brands like Dandies work great).
And that’s it!
With just two swaps, you can create a Christ Crispy Treats recipe that’s kind to every tummy.
Christ Crispy Treats
Equipment
- Large Pot
- Spatula
- 9×13 Baking Pan
- Parchment paper (optional)
Ingredients
Main Ingredients
- 6 tbsp unsalted butter
- 10 cups mini marshmallows divided
- 6 cups Rice Krispies cereal
- 1 tsp vanilla extract
- pinch salt optional
Instructions
- Line a 9×13 inch pan with parchment paper or lightly grease it.
- In a large pot over low heat, melt the butter.
- Add 8 cups of mini marshmallows to the melted butter and stir until completely melted and smooth.
- Remove from heat and stir in vanilla extract and optional pinch of salt.
- Gently fold in the Rice Krispies cereal until coated. Then quickly fold in the remaining 2 cups of mini marshmallows for extra gooey texture.
- Press mixture evenly into prepared pan without compacting too hard. Let cool completely before slicing into bars.
Notes
Conclusion: You’re Now a Christ Crispy Treats Master!
Making the perfect Christ Crispy Treats recipe is super fun, easy, and a little magical.
With the right tips, best ingredients, and a little creativity, your treats will be the hit of any party, lunchbox, or lazy Sunday afternoon!
Just remember: melt low and slow, don’t press too hard, and always have fun decorating.
Add some sprinkles, dip in chocolate, or cut them into cute shapes the options are endless.
Now that you know all the tricks, it’s time to roll up your sleeves and whip up your own batch of these yummy, chewy, buttery treats.
“The best treats are the ones made with love… and a little extra marshmallow!”